


Mad About Molds

From this mold… to this.
How?


Go from a donut shape to a partial shape,
by cutting off a section of clay. A mold does
not have to be limited to it’s shape, but a
tool to guide you to new ideas.
From this mold… to this.
How?


If you think of molds as tools and not just
molds, a world of ideas opens up for you. This
heart was simply made with a cookie cutter
centered in the middle.

From this mold… to this.
How?

By partly filling this mold, another face
can be made. If you make it rounder it
could be a full moon face. That’s at
least three molds in one.

From this mold… to this.
How?


Many times a mold that appears to be one
image can double as another. Hearts can be
wings, wings can be fins and leafs can make
flower petals.


From these molds… to this.
How?

Many combinations can be achieved by using
several molds for a new look. We know this
isn’t the exact picture, but you get the idea.
From this mold… to this.
How?


Transform the whole look of this heart by
cutting out a keyhole shape to make a lock.
Just use a drinking straw and a craft knife to
cut it out.


Use the over-flow of clay to your advantage
for a primitive or ancient look. Also create
unique backgrounds with ease. So easy!


By combining two or more molds the
possibilities are endless. Think of all the
different combinations you can come up with.
Try making a collage pin or a floral wreath. Or
try a patchwork covered tin or themed picture
frames.


From these molds… to this.
How?
From these molds… to this.
How?
From these molds… to this.
How?

This greeting card is a perfect example that
shows how cards & scrapbook pages can be
put together for a very special occasion.
Think about molds as tools for many variations
that expand their use.
Push molds invite us to look beyond first impressions. They invite us to use our imaginations. If you
are pressing clay into molds and just settling for the image that you get, you're missing all the fun!
After all, molds are a tool, and tools are meant to aide you, not limit your imagination.
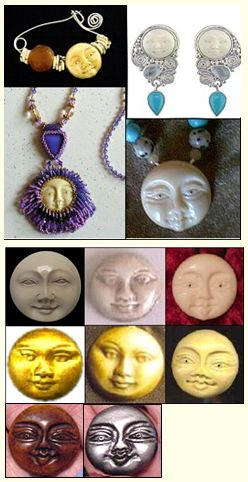
That said, lets use our Santa face mold as an example. (shown above) At first glance, you see a
Santa face, but if Santa's aren't your thing, you might pass it by without another look. Now look at the
face to the right of it, do you think "Santa"? Probably not, but it was made from the same mold. Quite
a transformation! That's because we think beyond the given shape of the image to what it might
become. By pushing clay into just the center of the Santa mold you can achieve a face for many
uses. This same technique can be used with many of our other molds. It's easy to alter the
expression on a face or distort other shapes if you know what it is you want to do.
Try manipulating other castings by stretching features, bending protruding parts, reshaping edges,
texturizing, or smoothing and reworking areas for many new looks. A few ideas to try are partly fill the
mold, trim the edges, or completely cut the casting in half or parts. Also consider objects that can be
added for endless possibilities, such as hair, stones, embedded sand, wires, nail jewels, or whatever
comes to mind. Texturing can be done with old tooth brushes, textured buttons, pin heads, textured
beads or sandpaper to name just a few.
Clay is very practice friendly. Don't like what you made? Scrunch it up and try again. No one is
keeping count of how many times you do it.
Here are a few hints that may make it easier for you.
Too much clay
One of the biggest problems that people have when using molds is that they just plain use too much
clay. The result is that the face becomes thick and the edges look ragged. If you try to trim it, you may
get fingerprints, or smush it. Although freezing the clay can make it easier to work with. To control the
look of the edges, press the clay into the mold. Then push it towards the center of the mold until you
see the outside outline of the mold all around the clay. See our free mold making movie on our tool
page to learn how we do ours with a perfectly flat back every time.
How much clay?
When using a mold for the first time, how much clay should you use? Do a trial run. What's it going to
hurt? Push clay into the mold, then pull it out. Image too big? Do it again with less clay. Image to
small? Do it again with more clay. Remember, it's okay to practice.
Use a release agent
Although flexible molds do not need a release agent, the results can be unflattering. The pressing to
release the casting leaves the piece distorted, bent, and dimpled. Not a desired look for quality work.
We recommend a light dusting of corn starch applied to the mold with a soft brush to the inside of the
mold. Too much powder and you will lose detail.
The lesson learned is: Look beyond, or within, the images in molds to see all the possibilities. Then
explore. Experiment. Dare. Discover. Combine. Embellish. Chop. Scrunch. Pinch. Challenge yourself
to create something new. Create.
Imagine all the possibilities
that you can create with just one mold.
Add character lines and other fine details
to faces with a needle tool if desired, for a
more expressions.
“Think about molds as tools for many variations that expand their use.”
Creative Ways To Use Molds

We recently made a discovery!
A new use for molds! What did you say?
Yes, our molds have so many uses, we are still coming up with new ideas for using
them! This one is amazing!
With the huge interest in essential oils and therapeutic uses, we were so excited
when we realized that our molds are perfect to use as an essential oil diffuser!
No kidding! It's true, just add a few drops to a mold and you have so many new
options.
Let me tell you about some of the options we came up with...
1. A clay pendant diffuser - This is a great idea for getting all of the therapeutic
benefits of aromatherapy by wearing it where ever you go. The warmth of your skin
enhances the aroma of your choice.
2. A non-chemical car freshener - This is great for reducing toxins and getting all of
the therapeutic benefits of aromatherapy while
in the car. Just scatter a few around, especially where the sun or air-vent might
catch the scent.
3. What's better then nice smelling clothes? Add a few of our pretty molds infused with oil into your drawers to work as sachets.
The scent will improve your mood every morning.
4. Make clay diffuser ornaments with a holiday essential oil blend of pine, cinnamon, nutmeg and vanilla. Mmmmmmm...
Directions:
Apply oil directly to our molds, or make your own clay shapes from our molds. Either way you can benefit from essential oils in a
very creative way. Before baking be sure to add a hole or screw eye if you want it to hang. Drop a drop of essential oil onto the
pendant, leave it flat for a minute or so to let the oil soak in and then enjoy the benefits of your oil all day.


- Home
- About us
- Art clay projects pmc
- Basic instructions
- Cameos and molds
- Contact us
- Castings materials and instructions
- Casting recipes
- Chat
- Custom molds
- Creative ways to use molds
- Flexible mold instructions
- Gallery to inspire
- Payment and shipping
- Safety precautions
- Search and site map
- Testimonials
- Troubleshooting
- Video
Mad About Molds
From this mold… to this.
How?
Go from a donut shape to a partial shape,
by cutting off a section of clay. A mold does
not have to be limited to it’s shape, but a
tool to guide you to new ideas.
From this mold… to this.
How?
If you think of molds as tools and not just
molds, a world of ideas opens up for you. This
heart was simply made with a cookie cutter
centered in the middle.
From this mold… to this.
How?
By partly filling this mold, another face
can be made. If you make it rounder it
could be a full moon face. That’s at
least three molds in one.
From this mold… to this.
How?


Many times a mold that appears to be one
image can double as another. Hearts can be
wings, wings can be fins and leafs can make
flower petals.
From these molds… to this.
How?
Many combinations can be achieved by using
several molds for a new look. We know this
isn’t the exact picture, but you get the idea.
From this mold… to this.
How?
Transform the whole look of this heart by
cutting out a keyhole shape to make a lock.
Just use a drinking straw and a craft knife to
cut it out.


Use the over-flow of clay to your advantage
for a primitive or ancient look. Also create
unique backgrounds with ease. So easy!
By combining two or more molds the
possibilities are endless. Think of all the
different combinations you can come up with.
Try making a collage pin or a floral wreath. Or
try a patchwork covered tin or themed picture
frames.
From these molds… to this.
How?
From these molds… to this.
How?
From these molds… to this.
How?
This greeting card is a perfect example that
shows how cards & scrapbook pages can be
put together for a very special occasion.
Think about molds as tools for many
variations that expand their use.
Push molds invite us to look beyond first impressions. They invite us to use
our imaginations. If you are pressing clay into molds and just settling for the
image that you get, you're missing all the fun! After all, molds are a tool, and
tools are meant to aide you, not limit your imagination.
That said, lets use our Santa face mold as an example. (shown above) At first
glance, you see a Santa face, but if Santa's aren't your thing, you might pass
it by without another look. Now look at the face to the right of it, do you think
"Santa"? Probably not, but it was made from the same mold. Quite a
transformation! That's because we think beyond the given shape of the image
to what it might become. By pushing clay into just the center of the Santa
mold you can achieve a face for many uses. This same technique can be
used with many of our other molds. It's easy to alter the expression on a face
or distort other shapes if you know what it is you want to do.
Try manipulating other castings by stretching features, bending protruding
parts, reshaping edges, texturizing, or smoothing and reworking areas for
many new looks. A few ideas to try are partly fill the mold, trim the edges, or
completely cut the casting in half or parts. Also consider objects that can be
added for endless possibilities, such as hair, stones, embedded sand, wires,
nail jewels, or whatever comes to mind. Texturing can be done with old tooth
brushes, textured buttons, pin heads, textured beads or sandpaper to name
just a few.
Clay is very practice friendly. Don't like what you made? Scrunch it up and try
again. No one is keeping count of how many times you do it.
Here are a few hints that may make it easier for you.
Too much clay
One of the biggest problems that people have when using molds is that they
just plain use too much clay. The result is that the face becomes thick and the
edges look ragged. If you try to trim it, you may get fingerprints, or smush it.
Although freezing the clay can make it easier to work with. To control the look
of the edges, press the clay into the mold. Then push it towards the center of
the mold until you see the outside outline of the mold all around the clay. See
our free mold making movie on our tool page to learn how we do ours with a
perfectly flat back every time.
How much clay?
When using a mold for the first time, how much clay should you use? Do a
trial run. What's it going to hurt? Push clay into the mold, then pull it out.
Image too big? Do it again with less clay. Image to small? Do it again with
more clay. Remember, it's okay to practice.
Use a release agent
Although flexible molds do not need a release agent, the results can be
unflattering. The pressing to release the casting leaves the piece distorted,
bent, and dimpled. Not a desired look for quality work. We recommend a light
dusting of corn starch applied to the mold with a soft brush to the inside of the
mold. Too much powder and you will lose detail.
The lesson learned is: Look beyond, or within, the images in molds to see all
the possibilities. Then explore. Experiment. Dare. Discover. Combine.
Embellish. Chop. Scrunch. Pinch. Challenge yourself to create something
new. Create.
Imagine all the possibilities
that you can create with just one mold.

Add character lines and other fine details
to faces with a needle tool if desired, for a
more expressions.
“Think about molds as tools for many variations that expand their use.”
Creative Ways To Use Molds
We recently made a discovery!
A new use for molds! What did you say?
Yes, our molds have so many uses, we are still coming up with new
ideas for using
them! This one is amazing!
With the huge interest in essential oils and therapeutic uses, we were
so excited
when we realized that our molds are perfect to use as an essential oil
diffuser!
No kidding! It's true, just add a few drops to a mold and you have so
many new
options.
Let me tell you about some of the options we came up with...
1. A clay pendant diffuser - This is a great idea for getting all of the
therapeutic
benefits of aromatherapy by wearing it where ever you go. The
warmth of your skin
enhances the aroma of your choice.
2. A non-chemical car freshener - This is great for reducing toxins
and getting all of
the therapeutic benefits of aromatherapy while
in the car. Just scatter a few around, especially where the sun or air-
vent might
catch the scent.
3. What's better then nice smelling clothes? Add a few of our pretty
molds infused with oil into your drawers to work as sachets.
The scent will improve your mood every morning.
4. Make clay diffuser ornaments with a holiday essential oil blend of
pine, cinnamon, nutmeg and vanilla. Mmmmmmm...
Directions:
Apply oil directly to our molds, or make your own clay shapes from
our molds. Either way you can benefit from essential oils in a
very creative way. Before baking be sure to add a hole or screw eye
if you want it to hang. Drop a drop of essential oil onto the
pendant, leave it flat for a minute or so to let the oil soak in and then
enjoy the benefits of your oil all day.